The light relationships.
We are, as photographers, collectors of light
There are three important camera settings which allow us to collect the light:
Aperture, Shutterspeed and ISO.
We’re going to start by looking at Aperture.
This is the size of the hole in the lens. Similar to our eyes, we can change the size of the iris or the aperture hole.
So how big or how small the hole is in the lens matters as it affects the image.
Q? How is aperture measured?
Reply: In F stops.
Here is the scale: (some lenses are fixed, or go lower or higher).
F5.6 f6 f8 f11 f16 f18 f20 f22
Lots of Light in Less Light in
This scale is found on the aperture ring on lenses. On newer digital lenses, a thumb wheel allows you to change the aperture which is then shown either inside the camera when you look through the viewfinder, or on the digital display screen externally.
This is called the Triangle of Light
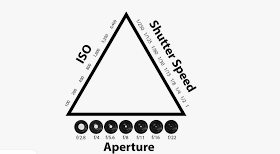
These relationships are inter-dependent on each other. Alter one and you may have to alter one of the others.
But that’s ok because it’s easy!
In Aperture Priority, (A or Av Mode) the camera takes care of the shutter speed and ISO. We’ll come back to this.
To change the amount of light into the camera you are in charge of the size of the aperture, you can also change the ISO, and the plus/minus buttons of exposure compensation.
If you change the aperture to let more light in, you are going down the scale towards f5.6 and the smaller numbers. If you want less light, move the aperture to the bigger numbers such as f18 and the size of the aperture is smaller, letting less light in. You can do this in Portrait mode on the iPhone 8 and above .
You control how much light you want to collect.
Why do we care? Because it gives we photographers creative control through focus and exposure.
Photographing people making the most of focus.
When you’re photographing people or subjects in general you need to be very aware of FOCUS. As photographers we can control what’s in focus and how the background looks. This is called DEPTH OF FIELD.
This is the amount of focus or out-of-focus behind the subject. Using the f stops (aperture) the amount of focus behind the subject can be controlled..

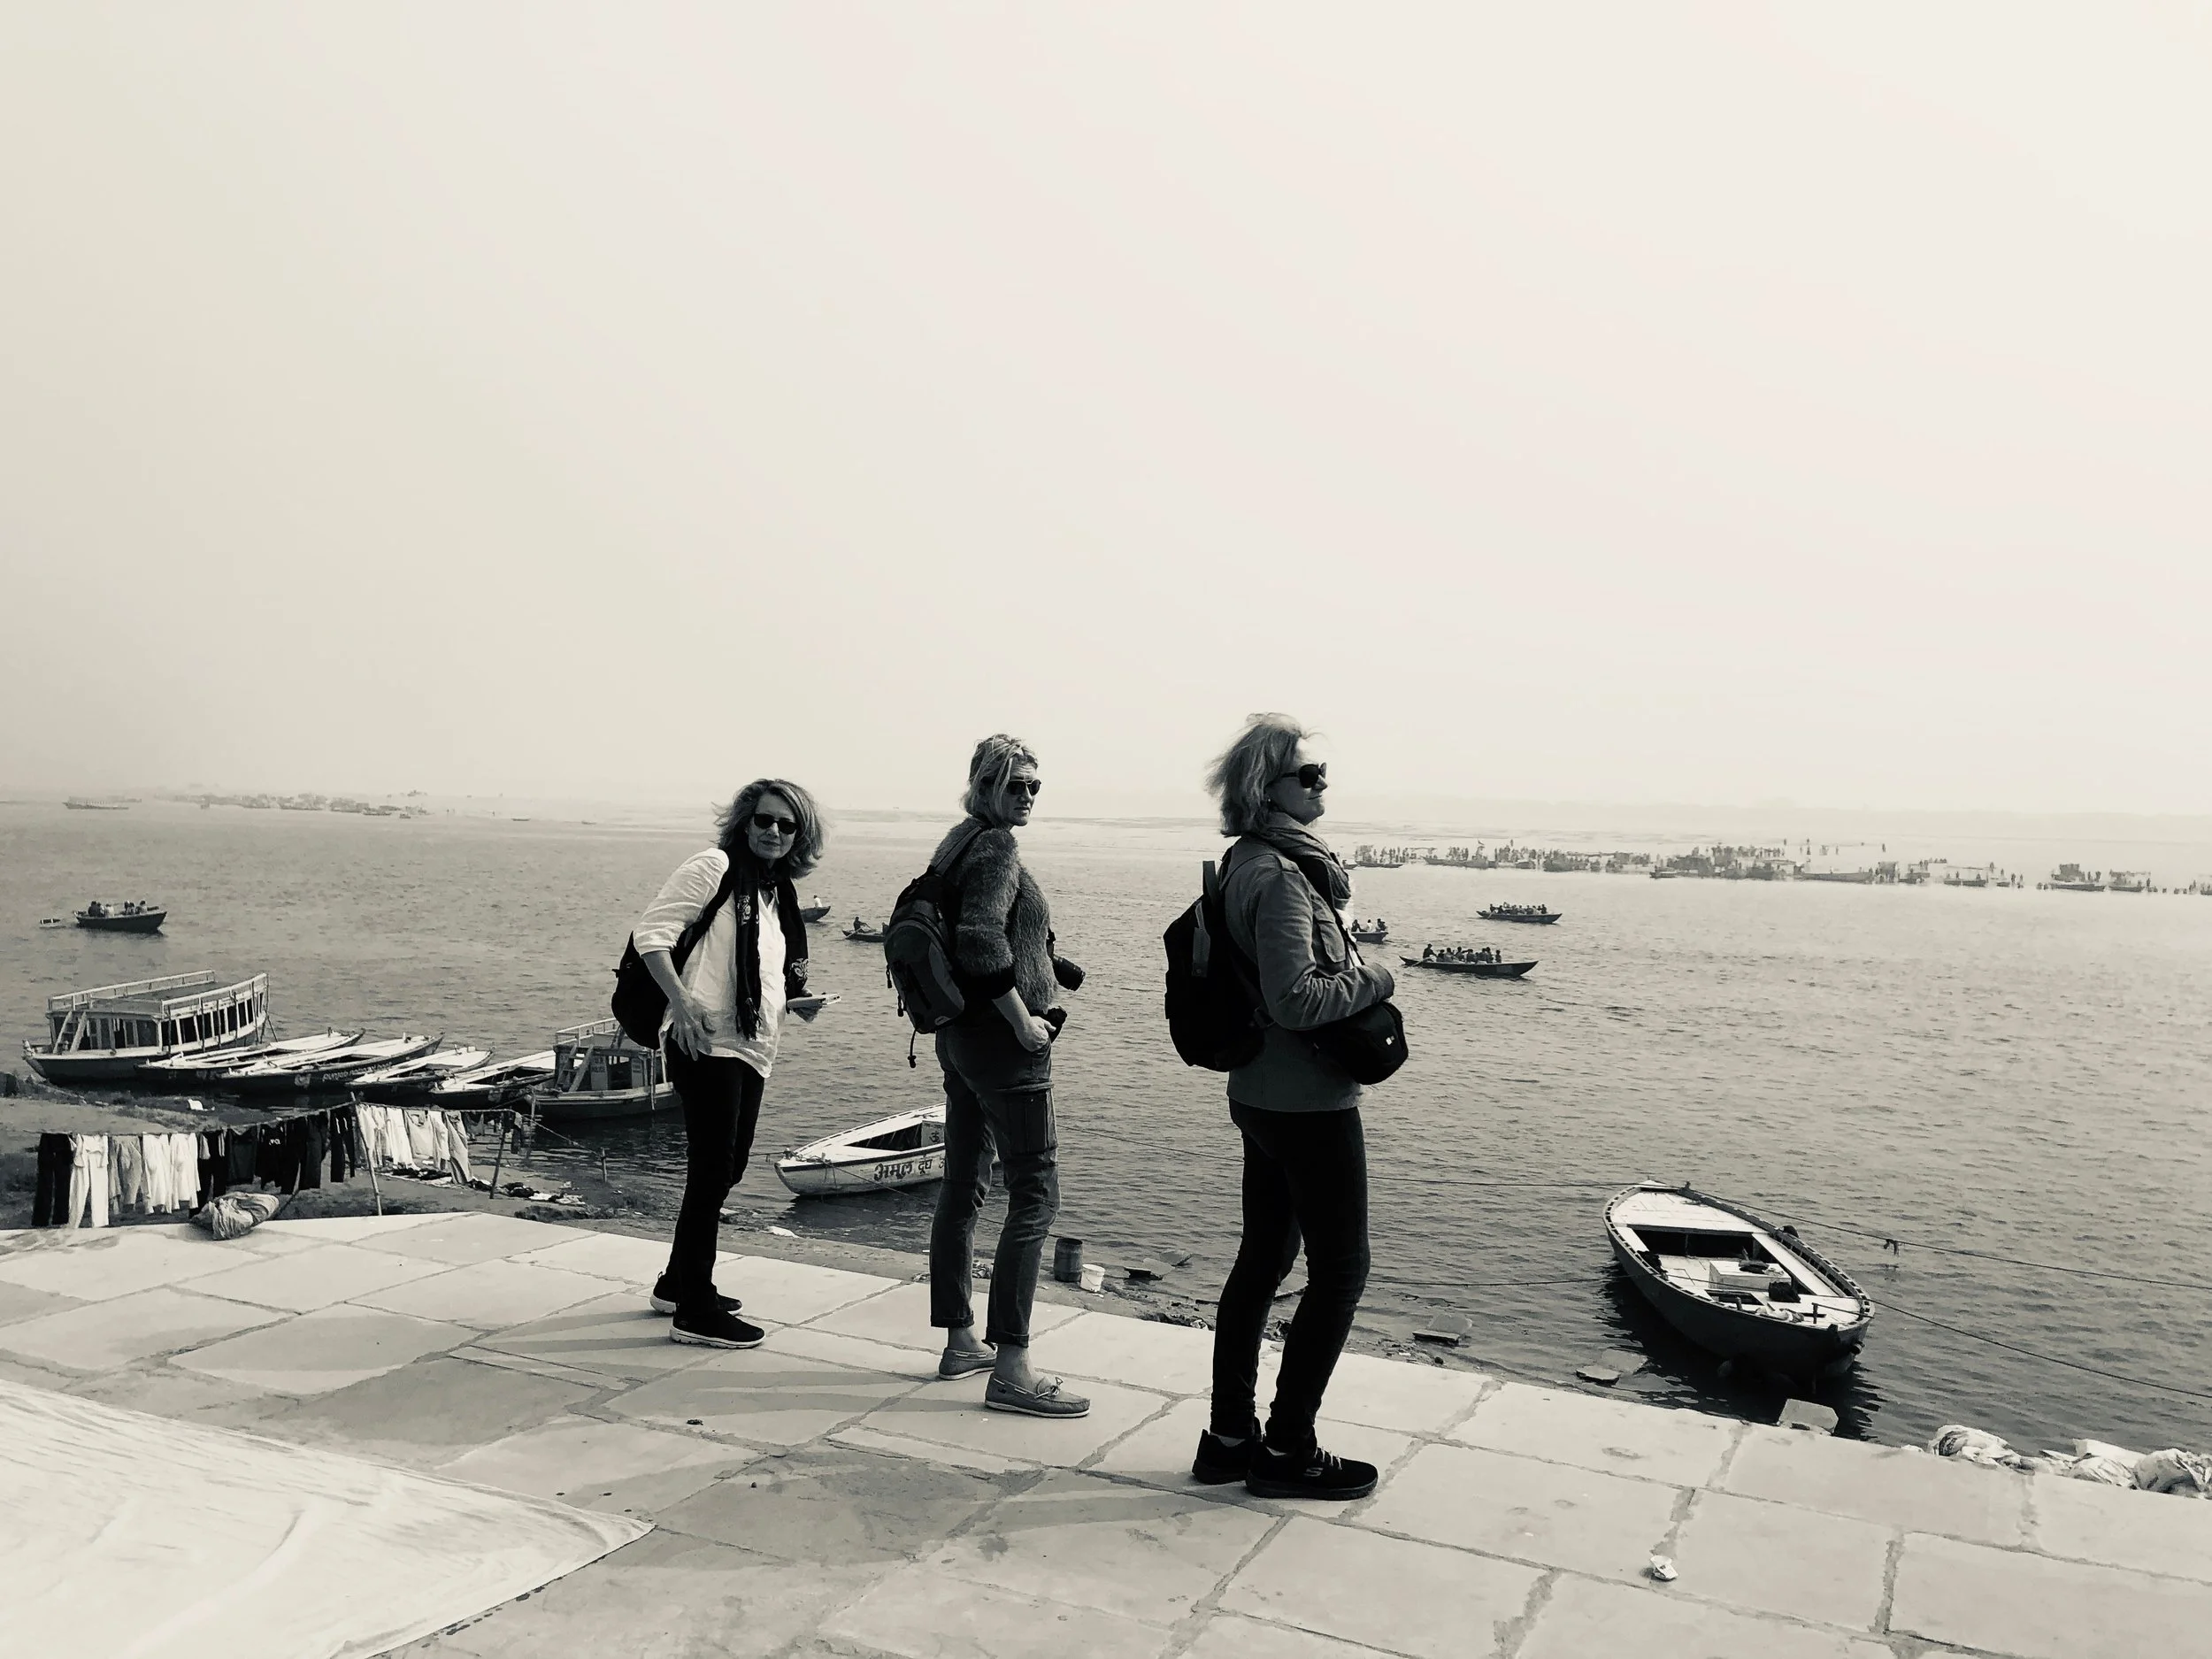
In this photo of a group of ladies at Varanasi I persuaded to be part of the Steve Jobs Project, there is a big depth of field and much of the background is in focus. I’m not convinced the middle lady is in focus but I like this image!
How do I set the camera up for a soft, dreamy, out-of-focus background - use f5.6 or lower.
You need at least 5 feet between your subject and the background (trees, walls etc) to create separation between the two. It helps if you have a zoom and you can extend the zoom as this helps throw the background out.
In the image of the two little girls in Kolkata on the railway lines, you see how the viewer is focused on their faces, and the background is out of focus.
TASK: Have a practice taking zoomed in shots with your subject not too close to the wall behind. Move them backwards and forwards to see how this affects the image. Keep the aperture on f5.6

At a Camel Fair I met this little fellow wearing his dad’s shoes. The depth of field here is sufficiently shallow that it takes a moment before you realise there’s a whopping great camel in the background. And what’s his sister doing? And is he snarling at me?

What is EXPOSURE?
+ Too Much, washed out, very light, no details. + = Over exposure
- Too Little, too dark, can’t see details in shadows. - = Under exposure
TASK: Take three images of the same subject, same light, using these three apertures:
F5.6 f11 f22
Can you see the differences?
Use your eyes. If it looks too bright, or dim, you can CHANGE the aperture.
Move along the scale to a smaller aperture.
Or of it’s too dark, move along the scale to a bigger aperture.
ISO
The third part of the lighting team is ISO
ISO is a measure of the camera’s sensitivity to light.
Simply, if you increase the ISO measure to a higher reading, you can operate in lower lighting conditions.
So why not do this all the time?
Well, there’s a trade-off in quality.
The higher the ISO, the lower the quality and the more ‘digital’ noise en the image.
Where do I alter the ISO and how is it measured?
ISO is usually on a dedicated button, on top, on the back or inside your menu. Automatic ISO is pretty reliable. It is measured simply from low (ISO100) to high (ISO1500+). Keeping below ISO800 is a good rule of thumb to prevent digital noise in your images. A normal overcast English day would probably see ISO400 as a starting point. India is much brighter, so knock it back to ISO100 and try not to take very bright images in the middle of the day if you want shallow depth of field and creamy backgrounds..
Then, to recap:
Aperture, Shutterspeed & ISO
are your 3 main ways to capture and manipulate light.
Your camera is smart. It can help you decide on lighting setups for you.
So you can either – use the settings it offers in automatic (landscape, sport etc), which are less refined but handy,
Or…
You take creative control through Aperture Priority.
A = Aperture Priority
This is where you choose the size of the hole or aperture to let a measure (fstop) amount of light in, and the camera works out the rest.
You decide on:
· What’s in focus
· How much light is in the image
· Depth of field or what’s in focus behind the camel
WHY do we care about APERTURE PRIORITY?
If we control aperture, we control the amount of light.
This has an impact on
· Exposure, under or over
· What’s in focus
· Bokeh (the cool out-of-focus light pools you sometimes see behind the subject)
· Creative effects you can’t get on automatic
APERTURE PRIORITY
· This is where you can adjust the depth of field we talked about.
· This is how we control EXPOSURE (how much light is in the image).
BASIC GUIDELINE SETTINGS for Aperture Priority A (on the top dial)
HIGH LIGHT F/16 – F/22
MEDIUM LIGHT F10, F/8 , f5,6
LOW LIGHT F6, F/5.6
F/22 is usually considered too small an aperture in the range so we tend to stick at about f/18 as the smallest.
exposure compensation
This is a nifty tool that allows you to add or reduce the amount of light into the frame, using a simple plus or minus button. It exists in varying places, sometimes in camera, sometimes on top, sometimes on the back.
It looks like this:

Hit this and you can change the amount of light in by adding light (PLUS)
Or removing light (MINUS)
Checklist for setting your shots up with buttery backgrounds.
It’s an early morning shoot. Jaisalmer is glowing like a jewel in the desert sun. The light is soft and nice.
WHAT do you do?
Try to find a steady place or a tripod.
Top of the camera: Setting A, Av
Change the Aperture to f5.6
Check Exposure Compensation is zero
Check ISO is at 100
WHAT do you do if the image is under-exposed?
If it’s too dark you can:
a) Increase ISO Try ISO400, no more than ISO800.
b) Exposure compensate (plus/minus button) PLUS for more light.
WHAT do you do if the image is over-exposed?
If it’s too light you can:
a) Check ISO is at 100
b) Exposure compensate (plus/minus button) MINUS for less light.
In this image of the pomfret taken in Kolkata (home to a huge number of brilliant markets), the aperture was about f8 as everything is in focus from fish eye to palm leaf underneath.Note the slightly orange eye which draws you into the narrative of the image.

for the moment, bear these thoughts in mind:
Don’t miss the picture because you’re panicking over settings.
Remember to zero all changes of ISO and Exposure Compensation.
If in doubt, stick it on auto and check what the camera thinks.
You can’t break your camera by altering the settings - so have a go at changing the mode to A for Aperture Priority & using the aperture thumb wheel from f5.6 to f18
Remember: With bravery we can do anything!